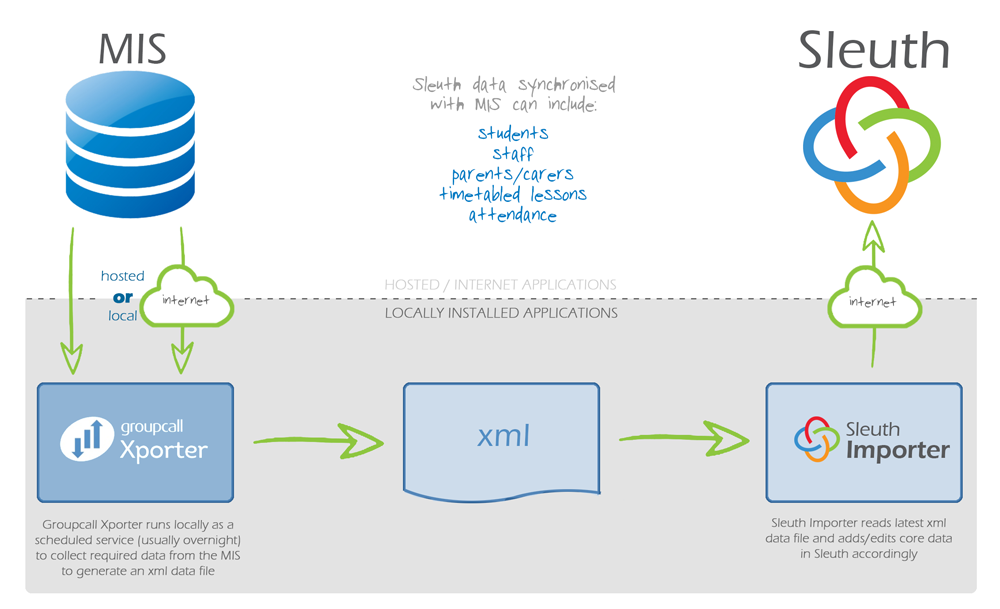
Once we have created your school’s Sleuth database, it can be populated with your staff and students using the Sleuth Importer tool which is included as part of a Sleuth Project. The Sleuth Importer takes data from your Management Information System (MIS) system and loads it into Sleuth. It does an initial load when first installed and then updates Sleuth automatically from then on (by default, daily at 0100) via a scheduled service.
The Sleuth Importer uses Groupcall Xporter, a third-party product which is included with the Sleuth Importer. If your school already uses the Groupcall Xporter then the process described below will update your current installation instead of installing again so you may not see all of the configuration steps listed below if they have already been filled in previously.

Please check with your MIS support service that any relevant setup or forms have been completed for your MIS system to allow access by Groupcall’s Xporter product. We attempt to inform you of all steps necessary but the process can be subject to change.
We recommend that you install the Sleuth Importer on your MIS server but if this is not possible then it must be installed on a machine with the correct access to your MIS and is switched on at the time you have configured the import to happen. The type of access varies with each MIS system, for example SIMS requires the SIMS client tools installed but for other MIS systems where a direct connection to the database is used you will just need a tcp connection to the relevant port on the MIS server. The machine you choose to install it on will also require internet access via port 80 and 443 to sleuth.schoolsoftwarecompany.com, schoolsoftwarecompany.com and groupcall.com domains. This can be via a proxy server if you know the proxy server address, port and any usernames or passwords that are required.
Capita – Sims.Net
If you are installing the Sleuth Importer for the first time and you use SIMS as your MIS you will need a SIMS user created with the following groups assigned to them: Third Party Reporting, Personnel Officer, Senior Management Team and School Administrator. We recommend that you create a new user called sleuth to keep it separate from members of staff.
Serco – Facility CMIS
You will need to specify the location of you CMIS .CDB file when you install Groupcall Xporter so please make sure you know where it is and we recommend you use the CMIS Sql Server user called STUD_ADMIN with the correct password. Note: It is possible to use a different Sql Server user but you will need to contact us for further setup information if you would like to do this.
RM Integris – G2
Double First – Engage
The Xporter program connects to Engage via a TCP connection to the MS SQL server database directly. This only needs to be a readonly connection so you will need to make sure you have a MS SQL database user setup with the datareader permission for the Engage database.
Arbor
To connect the Xporter program to Arbor you will need to know the Web service URL and have an API username and password from Arbor.
ScholarPack
You will need your ScholarPack API URL, ScholarPack API username and ScholarPack API password information ready before you begin. Also ensure you have completed the API configuration in ScholarPack (Admin, Config, API Configuration) requesting Groupcall access.
It is imperative that responsibility for the Sleuth Importer’s successful operation is recognised in school. A frequent check should be added to the school’s standard IT/Network procedures in order that any changes to server software (e.g. the MIS) or hardware (e.g. the MIS server) do not result in the Sleuth Importer failing to run for any length of time. To assist with this check, every Sleuth Admin User receives notification every time they login about the most recent run of the Sleuth Importer (and also the last successful run) in MyMessages on their Sleuth Home page. Any failure to run daily or any error messages should be reported to the IT team to be investigated.
The online help in Sleuth or the Sleuth Importer Notes describe how to resolve any issues arising with the Sleuth Importer.
